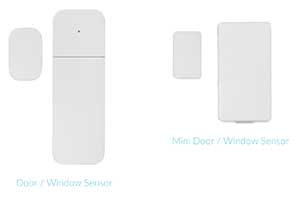
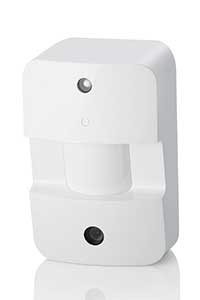
Abode’s starter kit comes with two door or window sensors, a motion sensor camera and hub.
Installing a home security system can be intimidating and scary, but thanks to the evolution of the security industry, there’s so many options to choose from and each has their own unique capabilities and functionality. Finding the right one for you, your family and your home can be difficult, but Abode is here to show that it doesn’t have to be.
Abode is a smart home security company that touts its “professional-grade security system that is easy to self-install with no long-term contracts, on-demand monitoring, and a powerful home automation platform.” The company was generous enough to send me a starter kit to review, and I’ve found the above to be pretty darn true.
In 2017, it shouldn’t be all that crazy to get complete security out of a box but for some reason I was skeptical when I began to pull the pieces out of the cardboard. The Abode Starter Kit comes with one Gateway, two door or window sensors, one remote KeyFob and one motion-sensing camera. As I began the installation process, I began to see the thoughtfulness, design and functionality of the kit.
Installation
The installation process was pretty easy, as the company’s website states. Prompted by a card in the box, your first step is to download the Abode mobile app, which is formatted for both iOS and Android smartphones. From there, the app guides your installation process, step by step.
Gateway. The first device to install was the Gateway, which acts as the brain of the security system connecting all of the devices together. The Gateway plugs directly into your modem and wall outlet but also features a battery backup that keeps the hub going for up to 10 hours in the event of a power outage.
Installing the Gateway was relatively easy as it only required two cords to connect. The Gateway quickly connected to my Abode app and the next step of installation was initiated.
 Door/Window Sensors. The kit comes with two sensors that can be used on a door or window. In my apartment, I decided to use these on the front door and the door that leads out to the balcony, which we in Texas call a “porch.”
The sensors are labeled “A” and “B” and consist of two parts, a larger portion which affixes to the door itself and a smaller piece that sticks to the door frame. When not on the door and door frame, the sensors are magnetic, pulling together every time I set them near each other.
The starter kit provides you with double-sided sticky tape so that you can maneuver these into place. The app explains that the pieces should not be more than one inch from each other and to try to place the raised dots on each piece as parallel as possible. After placing them, the app prompts you to name the sensor. I named mine “Front Door” and “Porch Door.”
The door sensors are powered by batteries, which threw me off a little at first. I had just double-sided-sticky-taped the entire thing to the door and wasn't sure I could pull it off over and over again to replace batteries, but a quick search about the sensors showed that for normal usage the batteries should last for more than ten years. A "stick it and forget it" kind of thing.
 Motion Sensor Camera. The installation of the motion sensor camera is the only device that I have to argue needs a tool to install, despite the company’s claims that this kit has a “tool free install.” On the back of the camera, there is a small screw that needs to be removed in order to insert the batteries (provided in the starter box) that give the camera life.
The camera comes with a backing that allows you to install it in the corner of the room with the same double-sided sticky tape that comes with the door sensors. I decided to mount mine in the corner of the living room. I have pretty high ceilings, so I placed it as high as I could while standing on a chair.
The motion sensor camera connects to the hub and shows up in the app instantly. The app asks you to name the camera and give it a couple of test shots. I named my camera “Living Room” and hit the button in the app to take a photo on the camera.
I was instantly blinded.
The flash on the camera is pretty strong, and if you are looking directly into it like I was, you will definitely be seeing stars for about 20 minutes or so. However, the light is necessary as the camera needs to have a way to see through low-light areas. (I learned later that even many feet away, the camera’s light is still pretty dang bright.)
Remote KeyFob. The last device in the box didn’t need much “installation” at all. The fob’s job is to make system control easier even when your hands are full, or from experience, your phone is dead. The KeyFob uses the long-range abodeRF frequency to communicate directly with the gateway and allows you to set your system to home, away or stand-by.
In the future, Abode hopes this fob will also be able to turn on your lights, lock doors and much more.
Security Plans
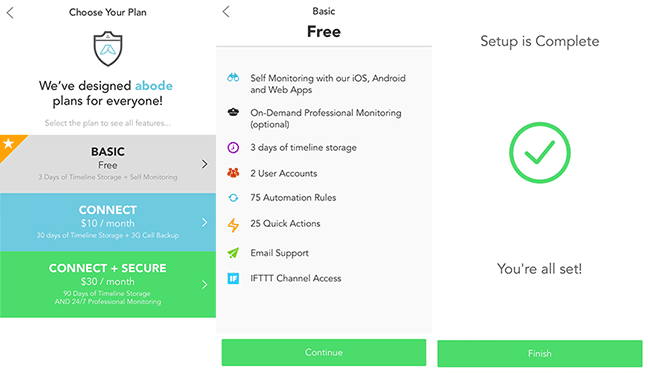
 In order to finish my installation process, I was asked to pick a plan. One of the things I love about Abode is you don’t have to pay for unnecessary monitoring if you feel like you don’t need it. I chose the Basic (read: free) plan that lets you store up to three days of timeline information in the app. You can connect up to 155 devices with this plan and have two users on the account.
There are other plans that allow you to keep your timeline information longer, such as the “Connect” plan that is $10 a month. With this plan you get everything that comes with the Basic plan, but you also get 3G Cellular backup connection that keeps your system going even if your internet is down. You also get 14 days of timeline and media storage.
The third option is the “Connect + Secure” plan that is $30 a month. You get everything you get with Basic and Connect but you also receive 24/7 professional monitoring with Abode’s UL-listed monitoring center and 90 days of timeline and media storage as well as premium customer phone support.
If you choose the Basic plan like I did, you have the ability to opt in to limited monitoring plans for a certain amount of time. This comes in handy when you decide to leave your home for a long period of time. You don’t have to continuously pay to have these added services, but the ability to add them when you want them gives this system the flexibility a homeowner needs.
Experience
The installation process moved pretty smoothly for me, taking no more than 20 minutes. The hardest part for me was getting behind my television stand to get to my modem to plug in the Gateway. This made the placement of the Gateway kind of limited since it needed to stay within a few feet of the modem, but I ended up liking it next to the television on my TV stand.
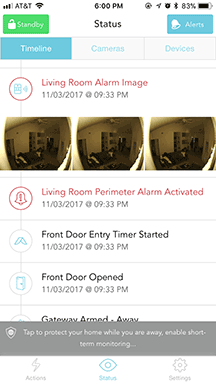
The door sensors and camera worked instantly. From the minute they were installed, I could hear a chime from the Gateway every time one of the doors opened. When the chime went off, the timeline in the abode app was updated to show the door was open.
The goAbode dashboard allows you to add users, personalize settings and create quick actions for your account. This allows you to tailor the system to be the exact way you want it, right down to how loud the Gateway chimes each time you open a door.
I did not have a camera (other than the one that was in the starter kit) to add to the system, but in the dashboard there is a place for video to stream to the account. This would make monitoring remotely very easy to do.
Personal Thoughts
I used the Abode starter kit for three weeks before starting this review. I wanted to make sure that I had used every feature that I could and give it a fair review from my perspective. For me, the starter kit with motion activated camera, door sensors and KeyFob was just the right amount of security. I could see adding a camera in the near future, but for now the Abode system does make me feel safer in my home.
During the three weeks, there was only one incident that left me a tad frazzled. On a Saturday night, I left to grab a bite to eat and do some shopping. While leaving, I placed the system in “Away” mode. I could see on the app the countdown to the system arming itself and then I was notified that the system was in “Away” mode.
I went to dinner and shopped a little bit, forgetting entirely about the alarm I’d set at home. I was completely into what I was doing, so I wasn’t paying much attention to my phone and it died while I was out.
When I got back to my apartment, I put my key in the front door and opened it thinking that I would get the usual chime I always hear when the front door is marked as open. I didn’t. I got ten seconds of beeping and then the loudest screech I’d ever heard. On top of that, the motion sensor camera went off, flashing its bright light and snapping photos of me in succession with the screeching. I started to throw things out of my giant purse, rummaging for my phone to disable the alarm only to find it was dead.
Mind you, I’d only had the system for a week at this point and I had totally forgotten about the KeyFob. I grabbed my keys and stared blankly at the four buttons. I went totally blank, I had no idea which button did what. So I moved closer to the Gateway and began to hit them all, just hoping the sound would stop. Thankfully, it did.
 Thankful. When I finally did get my phone back to life, there was a timeline of events in my Abode app that showed the alarm going off and being disarmed including three photos of my boyfriend and I trying to enter the apartment.
Even though I was pretty overwhelmed during the incident, I was thankful in the aftermath. What if that had not been me? If it had been an intruder when all of sounds and flashing lights went off, I would sure hope that would be enough for him to run rather than burglarizing my apartment.
The Plan. The limitations of the Basic plan mean you only get to scroll through your system’s information for the length of three days at a time, but for me that’s plenty. If an incident were to happen, you’d have more than enough time to pull the information you need off the app or dashboard and these days, with screenshots, nothing is truly gone.
I could see buying the additional monitoring if I were to move into a bigger house and were going to be gone for an elongated amount of time, which is nice assurance your things are safe.
Conclusion
There are a few things I am not in love with when it comes to the Abode Starter Kit. The door/window sensors are a bit large and bulkier than other sensors I've seen in the past. They are pretty visible wherever you decide to place them.
The other thing that bugged me a bit was the inability to customize the sound of the Gateway. While you can go into the dashboard and assign each action a sound level, you can’t actually change the tone that plays. I would be interested in seeing some variety in tones, since I am very sensitive to sounds, especially repetitive sounds.
Those dislikes, however, do not change how much I like this system.
All in all, I love the Abode system and would recommend it to anyone who is looking to start a home security system. This starter kit allows you to customize and add as many devices as you want to make the system worth it to you.
With Abode’s recent news about integrations with companies such as Nest and Philips Hue, they are definitely setting themselves up to be a major player in the home automation vertical as well as a top ranking security system for DIY security beginners who just want a little peace of mind.
The Abode Starter Kit is an affordable, easy-to-install solution that allows for the utmost security in a small package. Great things come in small packages, though, right?